Pages

Showing posts with label photos. Show all posts

Monday, 26 May 2014

Tips : Photo Booth

Nowadays, when we talk about occasional events like parties, and especially weddings here in Malaysia (we don't really organize big birthday parties here, though, some did), photo-booth instantly come into our minds. People loves taking photos of everything now and who would want to miss such moments, weddings of family members, daughters, sons, best friends and of course of their own weddings.  Whenever we go to a wedding ceremonies or even seeing others' photos on our FB wall, we can see a lot of photo-booth shots.  

Photo-booth is a place where people poses for fun and have their photographs taken by a cameraman or we can simply do selcas (I used to this term more than the 'selfie' term).  Some weddings, they prepared at least one photo-booth but some just use the bridal bed for photographs session for the guests.  Originally, this is the photo-booth (see below, captioned with 'photo-booth).  The one which we usually see in western movies.  Isn't nice?  I love it, and then your taken photos will instantly come out in strips and you can keep them in your wallet or paste them on your mirror.  
Photo-booth
In wedding events, we call it 'photo-booth' as well but not the real photo-booth is used as shown above but I don't really know why we haven't come up with another name, but I think this is fine too, it works the same way but only difference is that you have to print the photos back at home yourself.  'Photo-corner' might as well work, just a thought.

First things first~
Firstly, we need to pick a theme.  This is easy, just go for the wedding's theme.  But, you can always be creative and wild and be bold, but still take into consideration with the whole wedding's theme so it will blend very nicely.  So, let say I pick a purple as the colour theme.  Then, you might want to check for various colour combinations.  

Purple Color Combinations
colour combo here
Secondly, what we need in a photo-booth is a backdrop of your choice is important because we want a clean, nice-looking background, so there will be less interruptions of random strangers captured in our photos as well.  Also, having a nice, pretty backgrounds will make us feel like we are in a photo shoot session and sometimes we even feel like we are in a studio.  Your photos will come out more clean and organized.  If it is indoor, pick a wall (good for a support too) so it will be easier for us to hang some stuffs or simply to paste something.  For a backdrop, we can hang some cloths, like curtains or paste any deco directly on the plain walls.  Be creative.

Then, the most interesting part is the embellishment!  Have the desired photo-booth illusion in our mind and make it alive!  We can always draw them in a paper first for others to see.  Do not fuzz over on using expensive materials.  Cheap stuffs are always the best for this.  It is you that can make them look expensive.  Use your creativity and browse on DIY stuffs on the internet for inspirations.  Decide on what to put or what to hang and etc.

Paper lights
                                           
  
If seen from the above photo, it has a purple colour combo as the theme! A wall is used for the photo-booth and a curtain rail is installed to the ceiling so curtains can be hung from there.  A white wooden bench is placed in the middle of the set.  (you may ignore the bunga telur there) Balls of paper lights and of different sizes are used.  In each of the lights, butterflies and sakura plant are glued to them.  White fabric divider is set at the side of the set and green grass-like carpet is used for the floor (I wish it would be bigger than that :) )  And this photo was taken from wider perspective so I can show you the set as a whole.  You can see many fans down there!

Then, the props! This is the most fun part!  Hahaha! Props can be either funny faces cut out on a stick, cool phrases painted on small signboards, cool hats and etc.  I'd prefer to use only signboards with cool and funny phrases on them.  I prefer less on the funny faces stuffs because our faces will be distracted and yeah I cannot see the pretty faces.

the signs!
Some cannot be seen from here, I made these with my cousins and sister.  We used cardboard box cards for these and wide ice cream sticks as the handles.  We did some moustaches too, though and they are made from polyester felt.  The frame is made of two same sized cardboard and tied randomly and aggressively with two types of string, one is rough textured and the other softer and then glued with another cardboard so it would be tougher.  Some were also cut out from leftover boxes and we used mural and acrylic paints to write phrase on them.

Finally, we need people!  Make sure to capture the images within the set and with proper lighting you will create nice and decent photos!

Group shot
Family potrait
Closer group shot
Head shot with prop
Head shot without prop
whole body shot
We can also use only the prop & without the backdrop

Toddlers will make a great scene out of this
With frame

Kids with props
The whole photo-booth@photo-corner set

Photos are from my private collection.

Thursday, 3 April 2014

Tip: Photographing with Backlight+ Sun flare


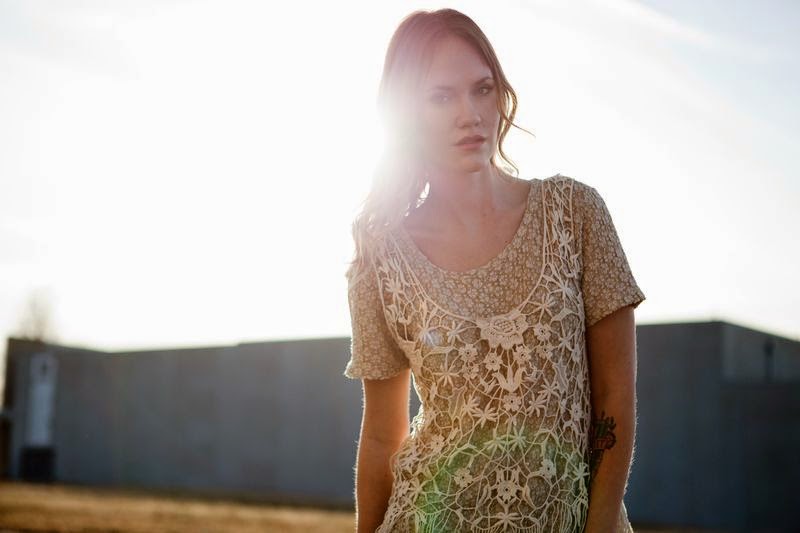
Who doesn't love a glowing background? There's something so gorgeous about an abundance of light taking over a photo- casting the perfect light on your subject. To do this, place your subject in front of a light source (in this case, we used the sun) and don't be afraid to experiment. There's no right or wrong it's all about placing your subject in the right place and once you have your settings in place- have your subject experiment with different poses, which allows the sun to peek through various body movements. The outcome really is beautiful and has a tendency to have a vintage and classic look.
When we took these photos, Kelli placed Emma directly in front of the sun and then let her pose so that the light leaked through it different ways. 


When we took these photos, Kelli placed Emma directly in front of the sun and then let her pose so that the light leaked through it different ways. 


The best time of day to experiment with glowing light is during the magic hour or anytime when the sun is lower in the sky. This makes it easier to pose your model in front of it! 


Sun flare is a natural occurrence that can be unpredictable.  You can find this light when posing your model in front of the sun.  You'll be able to see it through your camera's viewfinder as you move around and find the perfect position.

The notes and photos are not mine.  Reblog & taken from here.  Credit to them!


And yeah I watched this a few days ago.
Outdoor Potraits Tutorial by Tony Northrup 

Friday, 28 March 2014

Print Your Insta Photos!

So, as I promised you from the previous entry, I'd like to share some sites that are awesome and good for us.  I am so excited that I found these sites.  They make us want to keep on capturing photos and uploading them on Instagram just so that we can print them out!    


 photo tumblr_mb6q2bYZG61qdlkyg_zpsa597dd5c.gif MONSTARGRAM

Five websites to print your Instagram photos

This is a three simple steps away to get your printed photos on your doorstep! The site is beautifully designed and personally I think it is cute.  The instructions are clear and easy.  We can make the payment via a lot of banks of your choice.  Monstagram works by connecting to our Instagram accounts, choose our desired photos and make payment before getting your photos in your hands.  So far, there are three products available for us; The Krinkle Kut, Coloroids, & Magnets.  There is a free delivery to customers from Malaysia.  :D 

Monstagram is born because conventional photo prints feel tired and out of touch with our generation of Instagramers. We’ve created this for you. Live life now. Let us crystallize it later.

For more information, free to visit them here.


 photo tumblr_mb6q2bYZG61qdlkyg_zpsa597dd5c.gifWEDOO


This one is a Malaysian-based site.  A lot of printing formats to choose from.  You need to sign up and log in to make a purchase.  Some product may need you to download the software into your computer so you can have your photos in your own way.  I made an order last time and I like it!  

I ordered this as a birthday gift.
                                          
Visit here.


 photo tumblr_mb6q2bYZG61qdlkyg_zpsa597dd5c.gif PRINSTAGRAM


This is super nice site.  It offers a lot of products.  It ships internationally.  You would find all the things you need to know at the home site.  

Visit them here.


 photo tumblr_mb6q2bYZG61qdlkyg_zpsa597dd5c.gif ORIGRAMI


This is founded by a Sydney married couple and it was born to combine the two passions of origami+instagram.  I like the idea!  It offers worldwide shipping and has a lot of products to choose from.  

Visit them here.


For more:source
And yeah, if you would like to print your own photos, you would need to download your photos first.  Check this site out for the instruction.

Thursday, 27 March 2014

Tips: Food Photography

(so this is clearly not mine, I am just sharing this great post!)
1. Get as much natural light in the picture as you can. Make sure to turn the automatic flash off when you are getting ready to take a picture, the flash will ruin a perfectly pretty photo! You may need to move your dish toward a window or even take it outside to get enough pretty light in your photograph. And, this also means you have to plan ahead a little-if your dinner won't be ready until 7pm but the sun goes down at 6:30pm, sadly you probably won't be able to get a well lit picture. So make sure you cook or bake with enough daylight hours left.


2. Think about the whole image, not just the food. Pay attention to what kind of background you are shooting by. You may want to move your dish over slightly if something weird or unsightly is showing in the background (like a sink full of dirty dishes!). And think about your plates, bowls, silverware and other 'props' as you photograph. If you've just made a delicious looking salad you may not necessarily want to photograph it on a green plate, as the colors may clash and not look as pretty as other colors would look when paired together.


3. Try different angles. Some of my very favorite food photos were taken while I was standing on a chair directly above the dish I was photographing. You may feel a bit silly standing on a chair in your kitchen while 
taking pictures of a loaf of bread, but try different angles as much as possible. You'll be glad you did!


4. Fill the entire frame. You may want to frame your dish slightly off center, but this should be an artistic choice you have made and not an accident! Pay attention to what you can see in the image as you photograph. You may need to back up or move in toward the food, depending on your lens. You don't want to get so close that you can't tell what the food is, but you don't want a ton of negative space either.


5. Garnish, drizzle and take a bite! Don't forget to add a few sprigs of cilantro to the top of your curry. Drizzle on a little glaze just before photographing those cinnamon rolls. And, after you've take a few pictures, take a bite or slice a piece off so the photo looks like the food is in the process of being eaten. All these little details can really make a picture pop and give it that little extra interest that it wouldn't otherwise have. Have fun and try different things!


Aren't they coolest photos?  Great tips & Love them all.


Sunday, 16 March 2014

Instagram Project Ideas


So, do you love taking photos of yourself or your friends and family? Do you upload the photos on-line? Do you have instagram account?  I bet you do!  How about doing something off the record?  Instead of keeping the photos on-line, why not turn them into something that we can always look at without turning on your pc and mobile phones.  I have a few ideas that we can do with our Instagram photos!  

Instagram project
Print your photos in polaroid form
paislee-PL2014-1924
8.5x11'' collage
source
Instagram Project: How To Display Your Instagram Pictures » Little Inspiration
Love this idea so much.  All you need are an empty
 frame and strings.
Wall of Instragram photos
Wall of Instagram photos.
  source
INSTAGRAM book I want to do this badly.
Book of Insta photos@photobook
 source
Where to get an Instagram Photobook...great journal idea!
Instagram photo stories book
source
instagram_project_life_week_23
Your insta in Project life (we'll get to that later)
DIY instagram photo strips
Instagram photostrips

Amy tangerine Daybooks,love them cant wait to get one for myself!! <3
Mini books.  Just paste your insta photos in cute book
source
and there are many more!

So, which projects is your favourite?  I can't decide!  All of these are great and pretty!  If you guys prefer the photobook stuff, try Blurb and also Wedoo (this is one is for Malaysian :D, cause I am too a Malaysian).

Stay tuned to my next entry :D
I'll be writing about the printing instagram stuffs!
And how you can download your insta photos without a sweat.

 ( ´ ▽ ` )ノ

Wednesday, 5 March 2014

Photography Fun Facts

1. The first person who managed to make a "photographic" snapshot constant, that is to fix the image was Joseph Niepce. The very first snapshot in the history of photography is considered "view from the window," dated 1826. The exposure of the shot lasted 8 Hours.

2. The first person who invented negative was Fox Talbot. This event occurred in 1839. In the same year Hippolyte Bayard presented the first positive print to the world.

3. The first "photographic paper" was made ​​of asphalt. More precisely, asphalt varnish was applied on the copper or the glass plate.

4. Camera Obscura, which became the prototype of the modern camera, is used up to this day for the production of integrated circuits and as a special film camera.

5. The first color photograph was taken in 1861 by James Maxwell, the British physicist.

6. Appearance of the first plates for color photography dated back to 1904, produced by the company "Lumiere".

7. The first aerial photography was carried out by French inventor Turnache in 1858. He shot Paris from the balloon.

8. The first photos in Russia were made by Y.F. Fritzsche using the method of Talbot.

9. The first color photograph in Russia was published in "Memoirs of Russian Technical Society". Leo Tolstoy is captured on it.

10. They began to retouch photos and make them "color", which was achieved by coloring in watercolor for the first time in 1840.

11. In Russia, the first camera based on the theory of Daguerreotype was invented by Grekov back in 1840, that is, a year after the invention of photography. Alex Grekov also made experiments with photographs by the method of Talbot on the light-sensitive paper.

12. The first portrait by the electric light was made in 1879 by Levitsky, which required the exposure of 15 seconds.

13. The first cassette - one of the prototypes of modern photographic film - which had 12 sheets of light-sensitive paper, and, respectively, 12 shots, weighed 15 (!) pounds.

14. The basis of a digital camera was invented in 1973. It was a charge-coupled device, with which it was possible to obtain an image size of 100x100 pixels. The first astronomical electronic photo was taken with the help of this device the following year.

15. The story of a digital photo begins with camera Mavica, produced by the company Sony in 1981. Mavica is almost a full SLR with interchangeable lenses and resolution of 570h490 pixels. But then it was considered a "static camera," the result of which was not the video but static images - shots.

16. Officially the world's first digital camera is the development of the company Kodak, Stephen CESSON. The invented camera recorded an image on an audio cassette tape. Time of recording images from the moment you press the button was 22 seconds.

17. The term "megapixel" was first used in 1984.

18. The world's first auto-focus SLR camera was produced by "Polaroid" in 1979, and in 1985 "Minolta" produced a camera that eventually become the standard for SLR cameras.

19. According to statistics, at present, only 2 of 10 images taken with digital cameras are printed on paper.

20. The oldest camera was sold at the auction in Vienna in 2007, setting all-time overall record and having become the most expensive camera ever sold at auction. Rarity called "Daguerrotype Susses Freres" was sold for nearly eight hundred thousand U.S. dollars. The starting price was 100 000 euros.


Sunday, 2 March 2014

From these to those #1

These are what we get if we type 'diary' in Google search engine.  Obviously these brilliant photos are not mine.  I would love to get any of these and read them!  It is not always the content that attract me but in this case, the fully filled page of words that amazed me!  And also the fact that they are classic and vintage.  As you can see, to me, diary is all about writing.  There are a lot paragraphs of words.  Date and day are two most important and you don't want to lose it again in your record of writing!  And then write anything on any events that occurred on that day.  

And then we have these.  A lot of writing but with a little bit of drawings and photos are included too.  It gets more fun from here.  The top right photo is a garden diary and I guess so is the bottom right.  Wow that is new to me.  See, people can get anything to look cool and fun.  It can be all about you or diary of your cats.  Some are not fond with writing lengthy story and if you are one of them, you can always draw or doodle.  Be fun and let your creativity flows into your pages.  
Next are these pages!  We will get these result when we type 'journal' in the Google.  They are filled with colourful and I believe these were made with watercoloring?  There are drawings and these are taken from the same source.   It's a travel journal.  Inspire yet?  
These are more to visual art journal.  Mostly coloured and less writing.  I bet the people behind these are more expressive through visual.  They tell stories through drawings and paintings and they do it in books!  I love these ideas.  Whenever we look back at these even though sometimes they didn't come out the way we want them to be, they always have this eccentric values.  So, if you don't like what you see, don't throw them just yet, wait a few more years and you will be glad.  A nice feeling indeed.

I think that's it for now even though I have a lot more to write!  We will see more of other types of journal, well I think at least they started with a basic journal up until what we have right now.  Any way is great!  So are you inspire yet? =D

I guess they evolved? 
We will get to scrapbook!


 photo whydidntyoujustcooperateinthefirstplace_zps1a517116.gif