Pages

Showing posts with label photography. Show all posts

Tuesday, 8 April 2014

Why Should you Keep a Photography Notebook?

I found a brilliant post entry while searching for some infos on photos in notebooks.  I came across with this wonderful site & I fell in love instantly.  I never knew a photographer actually keep a notebook with themselves all the time whenever & wherever <singing like Shakira> And here is a note on why we should keep a photography notebook especially if you proclaimed as one.  This is suitable to any of us that is starting out as a photographer.  I hope we can be successful in this field :D.
This is a reblog & taken from Bumbles and Light. Credit to the owner.
Before digital cameras, photographers would keep notebooks to help them remember the various settings that they used for each exposure on a roll of film. They could develop the film and then go back to compare their notes with the outcome, deciding which settings worked, which did not and how they could either emulate the results in another shoot or what they should change for next time. With digital photography, we only have to look at our exif data on the computer to reveal our settings for each photograph, so why should we still keep a photography notebook?
It is still important that we have somewhere to make notes and record reminders. I prefer using a paper notebook because that’s how I work best, I enjoy writing by hand and having something physical to refer to, but you could keep notes on your smartphone using an app or any other electronic device you choose… although I find it’s best to use something that you can carry with you at all times. The notebooks I like to use have plain paper as opposed to ruled lines. I prefer this so that I have space to make drawings and sketches of ideas if I need to and so that I have room to make notes on previous ideas. If you go for a paper notebook, choose something sturdy as you will be using it and carrying it around often.

Photographer's Notebook, creative photography ideas, photography notebook

Photographer's Notebook, creative photography ideas, photography notebook

Notebook. No photographer should be without one!
- Ansel Adams
Having a notebook also means that you have something to refer back to when feeling uninspired. Hopefully the wonderful ideas you recorded on previous days will serve to inspire you on days when you may be feeling less creative.
What to Write in your Photography Notebook
Anything you like.

Use your notebook to keep track of those elusive concept ideas that you come up with in the dead of night, just as you begin to fall asleep. Ideas seem to strike at the most inopportune of times, I’ll find myself scribbling in my notebook while I’m waiting outside my son’s school for him to finish for the day, as I’m out working/dog walking, or as I’m brewing the morning’s coffee.

You can use your notebook to make a note of awesome locations you might see when you’re out without your camera, or perhaps in a car or on public transport and unable to stop. Locations that might work better at a different time of day, or a different season. Make notes and come back to them.
You can keep magazine clippings in your notebook to inspire you. Posing ideas from fashion magazines, interesting compositions, lighting or just generally inspirational images. Attach them to your pages and write notes alongside them.
As you’re editing, if you find an image that didn’t quite work but you’d still like to try and re-take it you can make a note of it. The location, why you think it didn’t work out the first time, ideas to try next time.
Keep notes of things you learn while reading or watching instructional videos and might like to try out yourself. You could be learning to use artificial lighting for the first time, use your notebook to sketch out lighting setups or to write ideas.

 Photographer's Notebook, creative photography ideas, photography notebook
Photographer's Notebook, creative photography ideas, photography notebook
Eventually, your photography notebook will become almost like a journal of your art and thought processes. These notebooks are good to hold onto, as you would a regular journal, to look back on. You might find yourself inspired years later by an idea you scribbled down hurriedly while standing in line to pay for your groceries.

Thursday, 3 April 2014

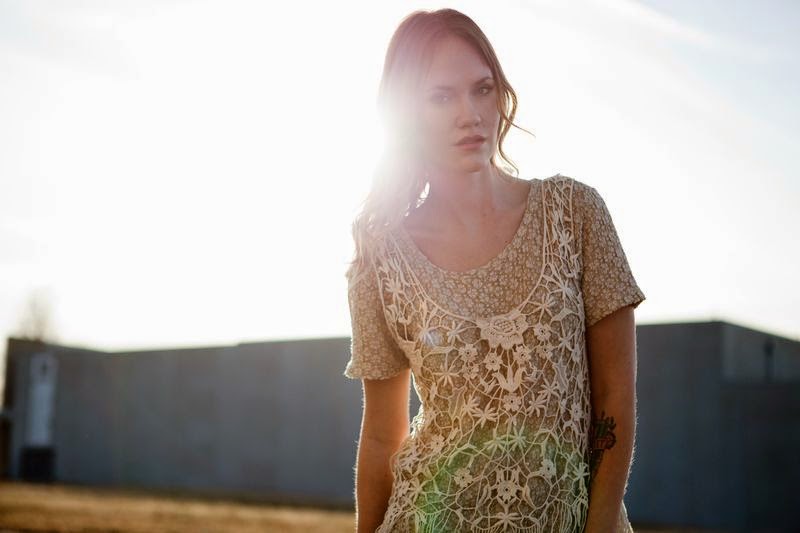
Tip: Photographing with Backlight+ Sun flare


Who doesn't love a glowing background? There's something so gorgeous about an abundance of light taking over a photo- casting the perfect light on your subject. To do this, place your subject in front of a light source (in this case, we used the sun) and don't be afraid to experiment. There's no right or wrong it's all about placing your subject in the right place and once you have your settings in place- have your subject experiment with different poses, which allows the sun to peek through various body movements. The outcome really is beautiful and has a tendency to have a vintage and classic look.
When we took these photos, Kelli placed Emma directly in front of the sun and then let her pose so that the light leaked through it different ways. 


When we took these photos, Kelli placed Emma directly in front of the sun and then let her pose so that the light leaked through it different ways. 


The best time of day to experiment with glowing light is during the magic hour or anytime when the sun is lower in the sky. This makes it easier to pose your model in front of it! 


Sun flare is a natural occurrence that can be unpredictable.  You can find this light when posing your model in front of the sun.  You'll be able to see it through your camera's viewfinder as you move around and find the perfect position.

The notes and photos are not mine.  Reblog & taken from here.  Credit to them!


And yeah I watched this a few days ago.
Outdoor Potraits Tutorial by Tony Northrup 

Thursday, 27 March 2014

Tips: Food Photography

(so this is clearly not mine, I am just sharing this great post!)
1. Get as much natural light in the picture as you can. Make sure to turn the automatic flash off when you are getting ready to take a picture, the flash will ruin a perfectly pretty photo! You may need to move your dish toward a window or even take it outside to get enough pretty light in your photograph. And, this also means you have to plan ahead a little-if your dinner won't be ready until 7pm but the sun goes down at 6:30pm, sadly you probably won't be able to get a well lit picture. So make sure you cook or bake with enough daylight hours left.


2. Think about the whole image, not just the food. Pay attention to what kind of background you are shooting by. You may want to move your dish over slightly if something weird or unsightly is showing in the background (like a sink full of dirty dishes!). And think about your plates, bowls, silverware and other 'props' as you photograph. If you've just made a delicious looking salad you may not necessarily want to photograph it on a green plate, as the colors may clash and not look as pretty as other colors would look when paired together.


3. Try different angles. Some of my very favorite food photos were taken while I was standing on a chair directly above the dish I was photographing. You may feel a bit silly standing on a chair in your kitchen while 
taking pictures of a loaf of bread, but try different angles as much as possible. You'll be glad you did!


4. Fill the entire frame. You may want to frame your dish slightly off center, but this should be an artistic choice you have made and not an accident! Pay attention to what you can see in the image as you photograph. You may need to back up or move in toward the food, depending on your lens. You don't want to get so close that you can't tell what the food is, but you don't want a ton of negative space either.


5. Garnish, drizzle and take a bite! Don't forget to add a few sprigs of cilantro to the top of your curry. Drizzle on a little glaze just before photographing those cinnamon rolls. And, after you've take a few pictures, take a bite or slice a piece off so the photo looks like the food is in the process of being eaten. All these little details can really make a picture pop and give it that little extra interest that it wouldn't otherwise have. Have fun and try different things!


Aren't they coolest photos?  Great tips & Love them all.


Wednesday, 5 March 2014

Photography Fun Facts

1. The first person who managed to make a "photographic" snapshot constant, that is to fix the image was Joseph Niepce. The very first snapshot in the history of photography is considered "view from the window," dated 1826. The exposure of the shot lasted 8 Hours.

2. The first person who invented negative was Fox Talbot. This event occurred in 1839. In the same year Hippolyte Bayard presented the first positive print to the world.

3. The first "photographic paper" was made ​​of asphalt. More precisely, asphalt varnish was applied on the copper or the glass plate.

4. Camera Obscura, which became the prototype of the modern camera, is used up to this day for the production of integrated circuits and as a special film camera.

5. The first color photograph was taken in 1861 by James Maxwell, the British physicist.

6. Appearance of the first plates for color photography dated back to 1904, produced by the company "Lumiere".

7. The first aerial photography was carried out by French inventor Turnache in 1858. He shot Paris from the balloon.

8. The first photos in Russia were made by Y.F. Fritzsche using the method of Talbot.

9. The first color photograph in Russia was published in "Memoirs of Russian Technical Society". Leo Tolstoy is captured on it.

10. They began to retouch photos and make them "color", which was achieved by coloring in watercolor for the first time in 1840.

11. In Russia, the first camera based on the theory of Daguerreotype was invented by Grekov back in 1840, that is, a year after the invention of photography. Alex Grekov also made experiments with photographs by the method of Talbot on the light-sensitive paper.

12. The first portrait by the electric light was made in 1879 by Levitsky, which required the exposure of 15 seconds.

13. The first cassette - one of the prototypes of modern photographic film - which had 12 sheets of light-sensitive paper, and, respectively, 12 shots, weighed 15 (!) pounds.

14. The basis of a digital camera was invented in 1973. It was a charge-coupled device, with which it was possible to obtain an image size of 100x100 pixels. The first astronomical electronic photo was taken with the help of this device the following year.

15. The story of a digital photo begins with camera Mavica, produced by the company Sony in 1981. Mavica is almost a full SLR with interchangeable lenses and resolution of 570h490 pixels. But then it was considered a "static camera," the result of which was not the video but static images - shots.

16. Officially the world's first digital camera is the development of the company Kodak, Stephen CESSON. The invented camera recorded an image on an audio cassette tape. Time of recording images from the moment you press the button was 22 seconds.

17. The term "megapixel" was first used in 1984.

18. The world's first auto-focus SLR camera was produced by "Polaroid" in 1979, and in 1985 "Minolta" produced a camera that eventually become the standard for SLR cameras.

19. According to statistics, at present, only 2 of 10 images taken with digital cameras are printed on paper.

20. The oldest camera was sold at the auction in Vienna in 2007, setting all-time overall record and having become the most expensive camera ever sold at auction. Rarity called "Daguerrotype Susses Freres" was sold for nearly eight hundred thousand U.S. dollars. The starting price was 100 000 euros.


 photo whydidntyoujustcooperateinthefirstplace_zps1a517116.gif