Pages

Showing posts with label tips. Show all posts

Monday, 26 May 2014

Tips : Photo Booth

Nowadays, when we talk about occasional events like parties, and especially weddings here in Malaysia (we don't really organize big birthday parties here, though, some did), photo-booth instantly come into our minds. People loves taking photos of everything now and who would want to miss such moments, weddings of family members, daughters, sons, best friends and of course of their own weddings.  Whenever we go to a wedding ceremonies or even seeing others' photos on our FB wall, we can see a lot of photo-booth shots.  

Photo-booth is a place where people poses for fun and have their photographs taken by a cameraman or we can simply do selcas (I used to this term more than the 'selfie' term).  Some weddings, they prepared at least one photo-booth but some just use the bridal bed for photographs session for the guests.  Originally, this is the photo-booth (see below, captioned with 'photo-booth).  The one which we usually see in western movies.  Isn't nice?  I love it, and then your taken photos will instantly come out in strips and you can keep them in your wallet or paste them on your mirror.  
Photo-booth
In wedding events, we call it 'photo-booth' as well but not the real photo-booth is used as shown above but I don't really know why we haven't come up with another name, but I think this is fine too, it works the same way but only difference is that you have to print the photos back at home yourself.  'Photo-corner' might as well work, just a thought.

First things first~
Firstly, we need to pick a theme.  This is easy, just go for the wedding's theme.  But, you can always be creative and wild and be bold, but still take into consideration with the whole wedding's theme so it will blend very nicely.  So, let say I pick a purple as the colour theme.  Then, you might want to check for various colour combinations.  

Purple Color Combinations
colour combo here
Secondly, what we need in a photo-booth is a backdrop of your choice is important because we want a clean, nice-looking background, so there will be less interruptions of random strangers captured in our photos as well.  Also, having a nice, pretty backgrounds will make us feel like we are in a photo shoot session and sometimes we even feel like we are in a studio.  Your photos will come out more clean and organized.  If it is indoor, pick a wall (good for a support too) so it will be easier for us to hang some stuffs or simply to paste something.  For a backdrop, we can hang some cloths, like curtains or paste any deco directly on the plain walls.  Be creative.

Then, the most interesting part is the embellishment!  Have the desired photo-booth illusion in our mind and make it alive!  We can always draw them in a paper first for others to see.  Do not fuzz over on using expensive materials.  Cheap stuffs are always the best for this.  It is you that can make them look expensive.  Use your creativity and browse on DIY stuffs on the internet for inspirations.  Decide on what to put or what to hang and etc.

Paper lights
                                           
  
If seen from the above photo, it has a purple colour combo as the theme! A wall is used for the photo-booth and a curtain rail is installed to the ceiling so curtains can be hung from there.  A white wooden bench is placed in the middle of the set.  (you may ignore the bunga telur there) Balls of paper lights and of different sizes are used.  In each of the lights, butterflies and sakura plant are glued to them.  White fabric divider is set at the side of the set and green grass-like carpet is used for the floor (I wish it would be bigger than that :) )  And this photo was taken from wider perspective so I can show you the set as a whole.  You can see many fans down there!

Then, the props! This is the most fun part!  Hahaha! Props can be either funny faces cut out on a stick, cool phrases painted on small signboards, cool hats and etc.  I'd prefer to use only signboards with cool and funny phrases on them.  I prefer less on the funny faces stuffs because our faces will be distracted and yeah I cannot see the pretty faces.

the signs!
Some cannot be seen from here, I made these with my cousins and sister.  We used cardboard box cards for these and wide ice cream sticks as the handles.  We did some moustaches too, though and they are made from polyester felt.  The frame is made of two same sized cardboard and tied randomly and aggressively with two types of string, one is rough textured and the other softer and then glued with another cardboard so it would be tougher.  Some were also cut out from leftover boxes and we used mural and acrylic paints to write phrase on them.

Finally, we need people!  Make sure to capture the images within the set and with proper lighting you will create nice and decent photos!

Group shot
Family potrait
Closer group shot
Head shot with prop
Head shot without prop
whole body shot
We can also use only the prop & without the backdrop

Toddlers will make a great scene out of this
With frame

Kids with props
The whole photo-booth@photo-corner set

Photos are from my private collection.

Saturday, 24 May 2014

Posing in Comfort~

My friends will be going for an audition by the end of this month.  They are auditioning for modelling casting somewhere in the capital city and they invited me to come along as a friend to help them (yeah of course not for me to audition hehe). 

For the past few weeks I've been helping them a little on photograph tips and we work together.  They need to prepare a portfolio for the audition.  Sometimes I help them take photos and as students we could only afford inexpensive basic digital camera (including phones) so we just play along with it~

While photo-shooting was taking place, as a cameraman, I need to ensure that they are comfortable with themselves and also to the cameraman.  Generally, they need to be comfortable at photo session so pretty photos can be captured.  From this, it helps me to identify what can make them comfortable during the session.  As a normal people with least expertise in this field, I did find something worth learning and practised.

  • First thing first, get a little Q&A session with them.  But normally with friends, it comes naturally. They'll tell you what they want and sometimes they will ask you on what to do now, then you would just instruct them.  Then, I guess they need to be comfortable with they are wearing.  Maybe we can help them rearrange the attire and the acc. If their hijab is a little bit off, tell them or help them fix it instantly.
  • Help them with the poses.  Some can do just fine and they are bold enough.  With beginners or anyone that asks for help, you can start by asking them to try few poses they've seen on magazines or blogs, etc.  Find their good angles and work with different perspectives.  Ex: Ask them to chin up, or maybe move a little bit to other side or even help them with footing! 
  • Compliment.  When they did fine and nice poses, compliment that behaviour.  This will motivate them and put the stress away.  Let them be themselves and play along with them.  Ask them to just move and capture when nice poses are spotted.  
  • Stay quiet.  Sometimes, I do this.  With camera in my hands and the subject in front of me, they'll eventually knows what to do.  I just smile (honest ones!) or nod when they did something worth captured.
  • Candids.  For this, I guess we have to try keeping the camera in my hand so I wouldn't miss any shots.  Even though the session is resting but the camera should not.  Natural emotions normally would be captured.

Easy to work with her as she knows how to pose.  Photo by me & edited by her

Things I should consider in the future session~
  • I should try directing them without asking them to pose too!  Maybe ask them to repeat what they were doing again and again.  The poses wouldn't always be the same but similar and that will help me getting a great shot and by this I believe they will be loosen up bit by bit.
  • Give a demonstration.  I can show what pose I want and demo it instantly.  I can also show them photos of others and ask them to give it a try,
  • Work with the best 3 eyelines.  Ask them to look at the light source, look down to your body and the third, to look at me.  <-- Reference: Christa Meola


Monday, 28 April 2014

How : Write the perfect travel journal

Follow these simple tips from the travellers behind award-winning Wanderlustmagazine for a travel journal that will keep your memories alive for years to come.

Ask yourself Who’s the diary for? Is it just for you to read – or to share with your friends? This could influence what you put in or leave out! It will also influence the tone and style in the way you write.
A journal is a wonderful memoir When writing your notes think about what you’ll want to remember from the trip in ten, 20, or even 30 years time.
The beginning and the end Use the beginning and end of the journal to set the scene, as a reference.
Things you might want to include are: your itinerary; your route plotted on a map; a ‘cast list’ of people you meet en route (include brief descriptions or even photos to job your memory); contact details of the people you would like to keep in touch with (and do keep in touch with them!); lists of ‘top moments’ or ‘best bits’ from your trip – best sunset, view, meal, restaurant etc.

Bring your journal to life
Entries don’t have to be chronological 
Write whatever catches your imagination, whenever it occurs to you.
You don’t have to record everything 
What you leave out is as important as what you put in.
Use dialogue 
Funny things you’ve overheard, or as conversation with a camel driver, for example.
Use ALL your senses 
Write about the sounds, smells, tastes and even textures.
Avoid listing your activities/descriptions/surroundings '
And then I did this... and then I did that’, it’s a captivating story not a repetitive list.
Illustrate it The act of drawing a building, termite mound or character will help etch them in your memory.
Scrap it!Stick in tickets, bottle labels, snippets from local newspapers, receipts etc –use the pocket in the back of the journal to hold them or stick them in next to the day they refer to – leaving you with a thick, full memory to look back on.

The practicalities
Give a day and date for each new memory – or you’ll forget what happened when.
Leave gaps here and there – you’ll be able to add things in as/when you remember them.
Get it down on paper while it’s fresh – it will be much more vivid. If there’s not enough time for a full description, jot down a few key words, which will jog your memory and fill in the gaps later.
It’s your journal so stick to what interests YOU. If you want to record distance in miles covered, units of wine drunk, funny road signs, tacky souvenirs, or cute cats then great – that’s your prerogative.
Enjoy yourself! Your travels and trips are fun – and your journal should be too! For you – the writer – and for those who will later read it.

this is written by Lyn Hughes and taken from Wanderlust!


Tuesday, 8 April 2014

Why Should you Keep a Photography Notebook?

I found a brilliant post entry while searching for some infos on photos in notebooks.  I came across with this wonderful site & I fell in love instantly.  I never knew a photographer actually keep a notebook with themselves all the time whenever & wherever <singing like Shakira> And here is a note on why we should keep a photography notebook especially if you proclaimed as one.  This is suitable to any of us that is starting out as a photographer.  I hope we can be successful in this field :D.
This is a reblog & taken from Bumbles and Light. Credit to the owner.
Before digital cameras, photographers would keep notebooks to help them remember the various settings that they used for each exposure on a roll of film. They could develop the film and then go back to compare their notes with the outcome, deciding which settings worked, which did not and how they could either emulate the results in another shoot or what they should change for next time. With digital photography, we only have to look at our exif data on the computer to reveal our settings for each photograph, so why should we still keep a photography notebook?
It is still important that we have somewhere to make notes and record reminders. I prefer using a paper notebook because that’s how I work best, I enjoy writing by hand and having something physical to refer to, but you could keep notes on your smartphone using an app or any other electronic device you choose… although I find it’s best to use something that you can carry with you at all times. The notebooks I like to use have plain paper as opposed to ruled lines. I prefer this so that I have space to make drawings and sketches of ideas if I need to and so that I have room to make notes on previous ideas. If you go for a paper notebook, choose something sturdy as you will be using it and carrying it around often.

Photographer's Notebook, creative photography ideas, photography notebook

Photographer's Notebook, creative photography ideas, photography notebook

Notebook. No photographer should be without one!
- Ansel Adams
Having a notebook also means that you have something to refer back to when feeling uninspired. Hopefully the wonderful ideas you recorded on previous days will serve to inspire you on days when you may be feeling less creative.
What to Write in your Photography Notebook
Anything you like.

Use your notebook to keep track of those elusive concept ideas that you come up with in the dead of night, just as you begin to fall asleep. Ideas seem to strike at the most inopportune of times, I’ll find myself scribbling in my notebook while I’m waiting outside my son’s school for him to finish for the day, as I’m out working/dog walking, or as I’m brewing the morning’s coffee.

You can use your notebook to make a note of awesome locations you might see when you’re out without your camera, or perhaps in a car or on public transport and unable to stop. Locations that might work better at a different time of day, or a different season. Make notes and come back to them.
You can keep magazine clippings in your notebook to inspire you. Posing ideas from fashion magazines, interesting compositions, lighting or just generally inspirational images. Attach them to your pages and write notes alongside them.
As you’re editing, if you find an image that didn’t quite work but you’d still like to try and re-take it you can make a note of it. The location, why you think it didn’t work out the first time, ideas to try next time.
Keep notes of things you learn while reading or watching instructional videos and might like to try out yourself. You could be learning to use artificial lighting for the first time, use your notebook to sketch out lighting setups or to write ideas.

 Photographer's Notebook, creative photography ideas, photography notebook
Photographer's Notebook, creative photography ideas, photography notebook
Eventually, your photography notebook will become almost like a journal of your art and thought processes. These notebooks are good to hold onto, as you would a regular journal, to look back on. You might find yourself inspired years later by an idea you scribbled down hurriedly while standing in line to pay for your groceries.

Thursday, 3 April 2014

Tip: Photographing with Backlight+ Sun flare


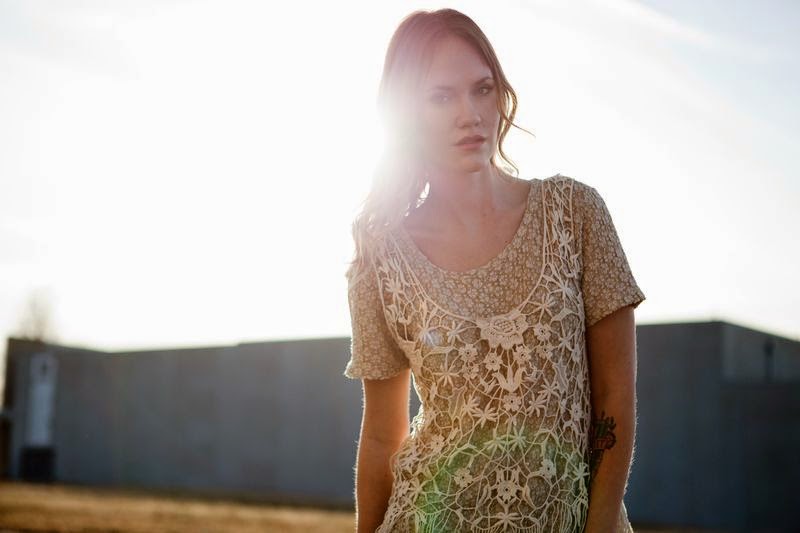
Who doesn't love a glowing background? There's something so gorgeous about an abundance of light taking over a photo- casting the perfect light on your subject. To do this, place your subject in front of a light source (in this case, we used the sun) and don't be afraid to experiment. There's no right or wrong it's all about placing your subject in the right place and once you have your settings in place- have your subject experiment with different poses, which allows the sun to peek through various body movements. The outcome really is beautiful and has a tendency to have a vintage and classic look.
When we took these photos, Kelli placed Emma directly in front of the sun and then let her pose so that the light leaked through it different ways. 


When we took these photos, Kelli placed Emma directly in front of the sun and then let her pose so that the light leaked through it different ways. 


The best time of day to experiment with glowing light is during the magic hour or anytime when the sun is lower in the sky. This makes it easier to pose your model in front of it! 


Sun flare is a natural occurrence that can be unpredictable.  You can find this light when posing your model in front of the sun.  You'll be able to see it through your camera's viewfinder as you move around and find the perfect position.

The notes and photos are not mine.  Reblog & taken from here.  Credit to them!


And yeah I watched this a few days ago.
Outdoor Potraits Tutorial by Tony Northrup 

Thursday, 27 March 2014

Tips: Food Photography

(so this is clearly not mine, I am just sharing this great post!)
1. Get as much natural light in the picture as you can. Make sure to turn the automatic flash off when you are getting ready to take a picture, the flash will ruin a perfectly pretty photo! You may need to move your dish toward a window or even take it outside to get enough pretty light in your photograph. And, this also means you have to plan ahead a little-if your dinner won't be ready until 7pm but the sun goes down at 6:30pm, sadly you probably won't be able to get a well lit picture. So make sure you cook or bake with enough daylight hours left.


2. Think about the whole image, not just the food. Pay attention to what kind of background you are shooting by. You may want to move your dish over slightly if something weird or unsightly is showing in the background (like a sink full of dirty dishes!). And think about your plates, bowls, silverware and other 'props' as you photograph. If you've just made a delicious looking salad you may not necessarily want to photograph it on a green plate, as the colors may clash and not look as pretty as other colors would look when paired together.


3. Try different angles. Some of my very favorite food photos were taken while I was standing on a chair directly above the dish I was photographing. You may feel a bit silly standing on a chair in your kitchen while 
taking pictures of a loaf of bread, but try different angles as much as possible. You'll be glad you did!


4. Fill the entire frame. You may want to frame your dish slightly off center, but this should be an artistic choice you have made and not an accident! Pay attention to what you can see in the image as you photograph. You may need to back up or move in toward the food, depending on your lens. You don't want to get so close that you can't tell what the food is, but you don't want a ton of negative space either.


5. Garnish, drizzle and take a bite! Don't forget to add a few sprigs of cilantro to the top of your curry. Drizzle on a little glaze just before photographing those cinnamon rolls. And, after you've take a few pictures, take a bite or slice a piece off so the photo looks like the food is in the process of being eaten. All these little details can really make a picture pop and give it that little extra interest that it wouldn't otherwise have. Have fun and try different things!


Aren't they coolest photos?  Great tips & Love them all.


 photo whydidntyoujustcooperateinthefirstplace_zps1a517116.gif